
Birthday Banner
Posted: March 1, 2012 Filed under: Sewing, Sprout 4 CommentsMy sweet girl turned one in January. The past year has flown by, and I am still adjusting to the idea that my baby is now technically a toddler.
We had a small family party for her in our home. For decorations, I sewed two fabric banners by following this bunting tutorial that I found via Pinterest.


I chose an orange and pink theme, and probably the hardest part for me was selecting the combination of fabrics. The rest was quite simple, and mostly I followed the tutorial. The only things I did differently were that I sewed 3/8″ around the sides of the triangles (instead of 1/2″), and I used a pinking blade on my rotary cutter (instead of pinking shears).

My husband suggested re-using them for subsequent birthdays. The crafter in me would prefer set these aside as keepsakes and then make something different every year, but time will tell whether I am ambitious enough to make that happen.
Holiday Gifts
Posted: December 9, 2011 Filed under: Sewing 6 CommentsLast year, I finished all of my gift sewing by the end of May. This year? I didn’t even start until October. Granted, I have a new little someone keeping me busy this year, so perhaps I should not have attempted handmade gifts. But I love doing it, so I blazed ahead anyway. Fortunately I finished!


Door Knob Organizer
Posted: October 17, 2011 Filed under: Sewing 4 CommentsI came across a door knob organizer on Pinterest, and was inspired to make my own version.


The back has a slot for outgoing mail or coupons.

I am trying to decide what to make as Christmas gifts for my colleagues, and am debating between this organizer and a mini Moleskin journal with a reusable fabric cover (from this pattern, which I have already tried). Which would you prefer to receive as a gift?
Pleated Shoulder Bags
Posted: September 13, 2011 Filed under: Sewing 3 CommentsLast year, I sewed Pleated Shoulder Bags as Christmas gifts for two of my dearest friends. I meant to post this in January, but never got around to it.
For the front, I chose an Etsuko Furaya fabric that had been in my stash for several years. The back and strap were made with dark gray wool, also from my stash.


The pattern is excellent, with clear instructions and full-size pattern pieces. I thought the bags were simple yet elegant, and admittedly I had a hard time parting with them.
Fast forward to last week, and I finally made one for myself. I used the same gray wool for the back, while the front is a Scandinavian bird print purchased from Superbuzzy a couple of years ago.


I am quite happy with this bag. It was equally exciting to me that I had the time to make it!
Padded Sleeve for Kindle 3
Posted: January 19, 2011 Filed under: Sewing 2 Comments
Hubby gifted me with a Kindle 3 for my birthday several months ago. It is my first e-reader and I’m really enjoying it! I wanted to protect it with a case and had found some lovely ones on Etsy, but I figured I could make a decent one myself. I thought I would post my instructions for making a padded sleeve for Kindle 3 in case they are helpful to anyone else. This is my first attempt at a tutorial, so please feel free to ask if anything is unclear.
Materials:

Main fabric
Cut two 6.5” x 9.25” (exterior panels)
Cut one 5” x 3.25” (tab closure)
Lining fabric
Cut two 6.5” x 8.75”
Cut one 5” x 3.25”
Cotton batting
Cut two 6.5” x 9.25”
Cut one 5” x 3.25”
Fusible interfacing: This is optional and may depend on the weight of your exterior fabric. I used medium-weight fabric, but I still interfaced it. My preferred fusible interfacing is Pellon SF-101 Stacy Shape Flex. I like to clip the corners to minimize the bulk a bit.
Cut two 6.5” x 9.25”
Cut one 5” x 3.25”
Velcro (3/4” wide): cut two strips 3.5” long
Seam Allowance:
The seam allowance is ½” throughout unless otherwise noted in specific steps.
Making the exterior:
1. If you are using fusible interfacing, fuse pieces to the wrong sides of exterior pieces.
2. Sew 1 piece of cotton batting to the wrong side of 1 exterior piece, stitching around sides and bottom using a ¼” seam.
3. Sew on the fuzzy Velcro piece 1.25” down from the top and 1.5” in from the sides on the right side of the same exterior piece as above. This will be the front of the padded sleeve.

4. Place the 2 exterior pieces right sides together. Lay the remaining main cotton batting piece on top. Sew around the sides and bottom. I like using the triple stitch (#18 on my machine) for an extra strong exterior seam. Trim excess fabric from the bottom corners and sides. Turn right side out and press.


Making the tab:
1. If you are using fusible interfacing, fuse piece to the wrong side of exterior tab piece.
2. Sew cotton batting to the wrong side of the lining tab piece, stitching around the sides and bottom using a ¼” seam.
3. Sew on the remaining Velcro piece 0.75” from the bottom and sides of the right side of the lining.

4. Place the lining and exterior tab pieces right sides together. Sew around the sides and bottom using the triple stitch. Trim excess fabric from the bottom corners and sides. Turn right side out and press.


Making the lining:
With right sides together, sew around the sides and bottom, leaving a 3” opening at the center of the bottom for turning.

Assembling the padded sleeve:
1. With right sides together, center the tab along the top middle of the back side of the exterior (which is the side without the Velcro piece). The tab will be about 0.75” in from the side seams. Sew on the tab very close to the edge or using a ¼” seam.

2. Slide the exterior of the sleeve (which is right side out) inside the lining (which is wrong side out), being careful to keep the tab tucked flat in between the exterior and the lining.

3. Line up both the side seams and the top edges. You will need to stuff the exterior into the lining a bit in order to line up the top edges.
4. Sew around the top edge. Again, I used the triple stitch here.

5. Pull the exterior through the hole in the lining and flip the lining right sides out. Press lining, and sew opening closed by hand or by stitching very close to the edge.

6. Stuff the lining all the way down inside the exterior and press.
7. Carefully topstitch around the top edge.

And you are done! This padded sleeve should be a very snug fit around your Kindle 3.


Terms of Use: For personal use only. Please do not sell these instructions or padded sleeves made from this tutorial.
Mini Gift Set
Posted: April 27, 2010 Filed under: Sewing 9 Comments
A couple of weeks ago I sewed up a matching tissue holder, zippered pouch, and drawstring pouch for a birthday gift. I paired linen fabric with a bright Robert Kaufman print, both from my stash. I tweaked the measurements from this great drawstring bag tutorial to create a bag in the desired size. I discovered that I really like making drawstring bags! The most time-consuming part for me? Sewing the drawstrings! I thought about buying them, but I really liked the idea of matching them with the fabric.

All packed up and ready to go!
Christmas 2010
Posted: March 1, 2010 Filed under: Sewing 9 Comments
Back in September, I cut the fabric to make sets of zippered pouches and tissue holders. I wanted to give the sets to my colleagues as Christmas gifts, and I was all pleased with myself because I was starting early. Of course, then I lost interest in sewing for three months and didn’t get around to making them. Three days after Christmas, I was totally in the mood to sew. Go figure. At least I’m early for 2010.


Orange Cherry Blossom Wristlet
Posted: September 16, 2009 Filed under: Sewing 9 CommentsSometimes I don’t want to carry my big purse when I’m just running out for a quick errand. But I still like to have my wallet, phone, keys, and tissue with me. Enter the wristlet.

The pattern, from Oh Fransson, is excellent. It offers different wristlet sizes and strap options, clear directions, and tons of photos. I chose style B1 with a plain fabric handle.

Zipper installation always makes me nervous because I don’t feel that I’ve mastered it yet, so I was very happy when it turned out well. I really like the way the zippers are done in this pattern.

There is even a small pocket inside.

I love this wristlet and I can definitely see more in the works.

Sew Much Fun
Posted: May 29, 2009 Filed under: Sewing 4 CommentsIn our den, we have two bright red armchairs. I love that they provide pops of color in a room filled with dark brown furniture, but I’ve been hunting for accent pillows to give them a more polished look. I really liked this pillow from Room and Board, but it was a little too large for the slim chairs. And I wasn’t willing to pay that much for a pillow, especially since I needed two of them. So I switched gears and started looking online at fabrics and pillow forms, and eventually ended up making two of my own 10×14 pillows.

I hadn’t sewn in more than a year, so it took me a few minutes to remember how to wind a bobbin and thread my machine! And I had to re-learn how to hand-sew a slip stitch (to close the opening) since I hadn’t done that in about three years. But it was fun, and now I’m planning to make accent pillows for our couch!
Mischievous Gnome Messenger Bag
Posted: March 17, 2008 Filed under: Sewing 15 CommentsI was inspired to sew again after seeing Monique’s gorgeous Mischievous Gnome Messenger Bag. If you click the link, you’ll see that I totally copied her.
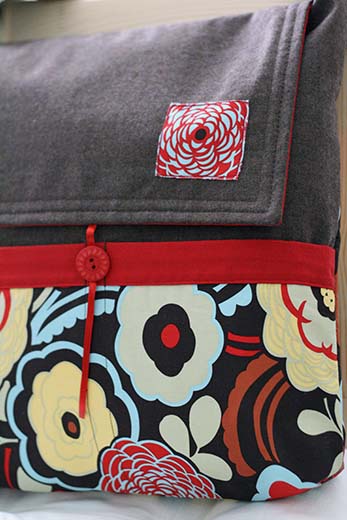
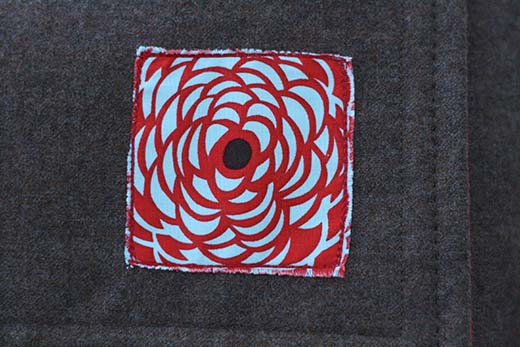
I love this little patch on the front

Inner side of strap (the outside is wool)

A ribbon wrapped around this button closes the bag

Interior zippered pocket
Pattern: Mischievous Gnome Messenger Bag by Montessori By Hand
Mods: I used a slightly heavier interfacing because I couldn’t find the one listed in the pattern. I also changed up the fabric combo a bit and used four fabrics instead of three.
Thoughts: The pattern instructions are absolutely stellar. I was a little nervous about making the interior zippered pocket — I’ve never done one before — but I had no problems understanding the process. I’m the type of person who likes very detailed instructions and I was completely satisfied with these! I also liked the full-size pattern pieces and the photos accompanying the directions. If Meg came out with more bag patterns, I would definitely buy them!
